作者:傅潔瑩 / 臺灣大學計算機及資訊網路中心程式設計組
如果您還尚未接觸過Google Calendar,可以到這邊看詳細介紹。只要開啟像Outlook Express的工具,就可以同時收信,並能夠直接存取Google Calendar…
前言
Google現在已經不僅僅是蒐尋引擎的代名詞,隨著Google版圖的壯大與成長,提供的服務也越來越多,其中Google Calendar就是相當方便的一例,如果您還尚未接觸過Google Calendar,可以到這邊看詳細介紹:http://www.google.com/intl/zh-TW/googlecalendar/tour.html,如果您已經是Google Calendar的愛用者,就讓我們繼續談下去。
這項線上服務雖然方便,不過如果每次都需要開啟瀏覽器,輸入帳號密碼,等待網頁載入之後,才能看到行事曆的畫面;如此這般,使用時間一長、次數一多,像我這種比較沒耐性的人,就開始覺得麻煩,想尋找有沒有比較偷懶的解決方案。
某天我的某位壞朋友(專門勸敗各式3C逸品)-leafy大人,介紹了一個好東西給我,從那天之後我就可以只要開啟像Outlook Express的工具,就可以同時收信,並能夠直接存取Google Calendar,不用登入網頁,也會跳出提醒事件;當然,電腦還是要能夠跟網路保持連線,否則無法更新顯示即時資料啦!現在就要把這樣好東西分享給各位,我將從下載到安裝,到如何設定,一一替各位說明。
下載Thunderbird
要在本機也能存取Google Calendar資訊的前提就是,必須使用Thunderbird,如果你已經是Firefox的愛好者,相信對Thunderbird並不陌生;Thunderbird 是 Mozilla新生代的郵件管理程式,有許多強大好用的功能。下載步驟為:
1. 可以到這裡http://moztw.org/thunderbird/下載安裝套件,點選右上角淺綠框(請記得選擇適合你電腦作業系統的版本,如圖示)進行下載。

2. 因為瀏覽器的預設安全性,通常都會被阻擋,請點選下載檔案。

3. 將安裝檔儲存在你的電腦。

安裝Thunderbird
1. 下載完成後,直接對安裝檔點兩下開始進行安裝

2. 按執行

3. 開始安裝

4. 按下一步

5. 選擇接受上述條款,然後按下一步

6. 選擇標準安裝,按下一步


7. 安裝完成,先把立刻啟動的勾勾取消,按結束

這樣就完成了安裝的工作。
下載相關套件
安裝完成後,先不要急著打開,還有兩個套件要下載,第一個套件叫做Lightning,請到這邊下載套件:https://addons.mozilla.org/en-US/thunderbird/addon/2313
步驟 1. 對畫面中下方綠色Install Now按鈕。

步驟 2. 按儲存後,挑個地方把檔案存起來。

接著請再下載最後一個套件:https://addons.mozilla.org/en-US/thunderbird/addon/4631
步驟 1. 對畫面中下方綠色Install Now按鈕。

步驟 2. 按儲存後,挑個地方把檔案存起來。

啟動Thunderbird
現在我們要開始安裝剛剛下載過的套件囉,首先啟動Thunderbird:
如下圖,從開始功能表→所有程式→Mozilla Thunderbird→Mozilla Thunderbird

如果你原本是Outlook Express的使用者,想把所有郵件都轉到Thunderbird,就選第一項,如果你用的是Office的Outlook,要轉移所有信件,就選第二個;如果你覺得怕怕的,只是想先看到底怎樣在本機端就可以使用Google Calendar ,那就選不要匯入任何東西,最後按下一步。(這裡我先選擇把我的Outlook Express的信件通通匯入。)

如果你的Outlook Express裡面已經有很多email,那匯入需要久一點的時間。

匯入完成後按確定,如下圖,直接使用預設值,所以直接按確定即可。

安裝相關套件
第一次啟動完成後,現在要安裝第一樣套件Lightning:
步驟 1. 到工具的下拉式功能表,選擇附加元件。

步驟 2. 選擇剛剛儲存的Lightning套件,按開啟。

步驟 3. 按下立刻安裝。

步驟 4. 安裝完畢後,請按下系統建議的重開按鈕。

接著安裝Provider for Google Calendar套件,程序與Lightning相同: 步驟 1. 到工具的下拉式功能表,選擇附加元件。

步驟 2. 選擇剛剛儲存的Provider for Google Calendar套件,按開啟。

步驟 3. 按下立刻安裝。
步驟 4. 安裝完畢後,請按下系統建議的重開按鈕。

進行完上述八個步驟,兩個套件都安裝完畢了,接著就要要登入Google Calendar,取得相關的資訊。
取得Google Calendar的相關資訊
步驟 1. 登入你的Google Calendar,點選左下角的管理日曆。

步驟 2. 對著你想要放到本機端處理的日曆點選『分享:編輯設定』。

步驟 3. 接著點選這個日曆的詳細資料

步驟 4. 選擇私人網址的XML。

步驟 5. 之後會跳出一個日曆網址,把這段網址複製。


將Google Calendar設定到Thunderbird
複製完你的Google Calendar網址以後,接著請啟動Thunderbird。
步驟 1. 進入Thunderbird後,點選左下方的calendar,然後點選new。
 \
\
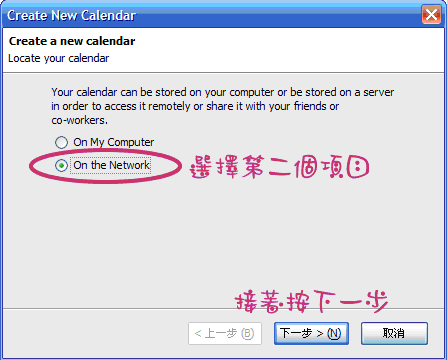
步驟 2. 然後選擇第二個,on the Network選項後按下一步。

步驟 3. 選擇第三個Google Calendar,然後在下方空白處將先前複製的Google Calendar網址貼上。

步驟 4. 幫你的Google Calendar取個名字,然後挑個喜歡的顏色。

步驟 5. 鍵入你在Google Calendar的帳號密碼。

步驟 6. 按下完成。

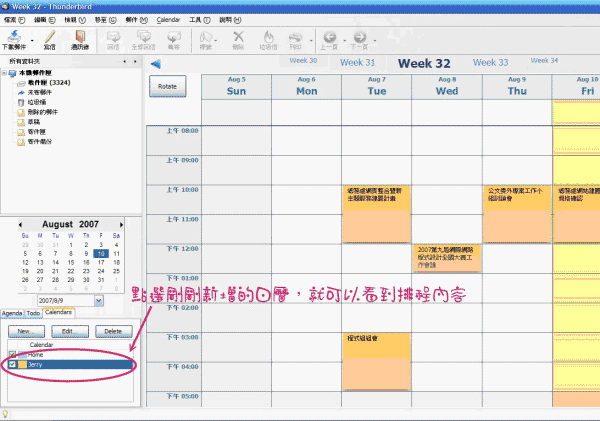
這樣就全部設定完成了,點選剛剛新增的那個日曆名稱,就可以看到跟Google Calendar類似的畫面(如下圖):

也可以直接在上面新增、修改、刪除你的行事曆內容,同時在Google Calendar上面設定的提醒功能,同樣也會跳出訊息視窗告知,非常方便喔!
如果想要多把其他在Google Calendar上的日曆設定進來,只要重複上一段『將Google Calendar設定到Thunderbird』的設定步驟,就可以成功新增了。